
How to Do Routing Using Only React State
When To Add Routing
Say you have a one page site you've created in React, using create-react-app. In my last tutorial, I made this, with basic styling.
Now you're ready to add routing.
You want things to appear on their own page. Each blog post should get its own page. There should also be an About page, and maybe a Corporate Values or a Team page.
Routing means that when, say, users go to /about, your app goes to an About page, and when users go to /faq, your app goes to a FAQ page (assuming you've written those pages in advance).
Potential Routing Solutions
There are multiple solutions for routing in React.
There are several routing libraries. The default choice is probably React Router - but did you know you can also use state?
This might be appropriate if your app is very simple and doesn't need any complicated logic.
I did routing using state in this tutorial, and I'll walk through the code below.
Here's what the site looks like once complete.
http://reactstate.s3-website-us-east-1.amazonaws.com
Here's how to make it.
Using React State to Do Routing
The useState hook can be used with a function, and through that, it can be used to do routing.
import React, { useState } from 'react';
export default function App() {
const [Page, setPage] = useState(() => Home);
const navigateTo = component => setPage(() => component);
return (
<div>
<Page />
<div>
<button onClick={() => navigateTo(Home)}>Home</button>
<button onClick={() => navigateTo(Email)}>Email</button>
<button onClick={() => navigateTo(Calendar)}>Calendar</button>
</div>
</div>
)
}
function Home() { return ( <div>Home page</div> ) }
function Email() { return ( <div>Email page</div> ) }
function Calendar() { return ( <div>Calendar page</div> ) }
This doesn't have the advantages of React Router, like a forward and a back button, or a history.
But it simplifies your routing by a lot. There's no boilerplate. It doesn't get simpler than this.
React App Structure
Start with Create-React-App
Use create-react-app to create the app's directory structure.
Run this command:
npx create-react-app blog
Then edit the default App.js page to have a title and display text.
Making a Tech Company Blog Site
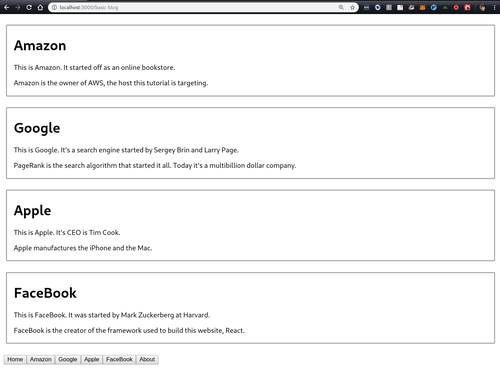
My example site is about tech companies; each paragraph-sized post will has a description of a famous one - Amazon, Google, Apple, FaceBook.
All the code I've personally written is in a single file, App.js.
There's just five components: one for each company, and one more to space them so they're not flush with the left side of the page.
The components, and companies (one for each component), are Google, Amazon, Facebook, Apple, and Spacer.
This last one, Spacer, is a styled component, meaning you now have a dependency, styled-components; you can add it with the command npm install or yarn add styled-components from your root directory.
Here's how the code looks.
import React from 'react';
const Google = () => (
<p>This is Google. It's a search engine started by Sergey Brin and Larry Page.</p>
<p>PageRank is the search algorithm that started it all. Today's it's a 100 trillion dollar company.</p>
)
//then a bunch of other components like the Google one, just with different text...
function App(){
return (
<Spacer>
<Google/>
<Amazon/>
<FaceBook/>
<Apple/>
</Spacer>
);
}
export default App;
Each of the components is basically simple text against a plain background, surrounded by html tags.
Adding Routing
Now I take the routing material shown it in the screenshot, and integrate it into my file.
Here's how it looks, when complete.
Click on the s3 link to see it in action.
http://reactstate.s3-website-us-east-1.amazonaws.comHere's the code, after being fully implemented in my file.
const NavButtons = ({setter}) => (
<Spacer>
<button onClick={()=>setter(()=>Home)}>Home</button>
<button onClick={()=>setter(()=>Amazon)}>Amazon</button>
<button onClick={()=>setter(()=>Google)}>Google</button>
<button onClick={()=>setter(()=>Apple)}>Apple</button>
<button onClick={()=>setter(()=>FaceBook)}>FaceBook</button>
<button onClick={()=>setter(()=>About)}>About</button>
</Spacer>
)
export default function App() {
const [Page, setPage] = useState(() => Home);
return (
<OneColumn>
<Spacer>
<Page />
<NavButtons setter={setPage}/>
</Spacer>
</OneColumn>
)
}
Download the Code
In this app I used state to set how the page should look.
In order to help with this, I pass the state-setter, setPage, to the NavButtons component.
I could've also used useContext, an alternative you can consider.
See the GitHub repo with the App.js file for the important code.
https://github.com/julianeon/react-state-router
I also have two other App.js file versions in the repo, for simpler and more advanced versions of the same app.
Now you know how to implement routing in a React app using state.