Email Submit Forms Using JavaScript
Setting Up A Submit Form Using JS & Cloud Services
Often you have a website that you want people to be able to email, from the site itself, using a form.
To do this, there are a few pieces you need.
You want: a place to host your website and code; a form on your website; an API you can make requests to in order to store the emails you get, and a database to save them.
It sounds like a lot, but a lot of cloud service providers today make it easy to hook these pieces together.
This is especially useful if you have multiple side projects, because then you can reuse the same form on multiple sites.
How to Set Up A Submit Form Using JavaScript and AWS
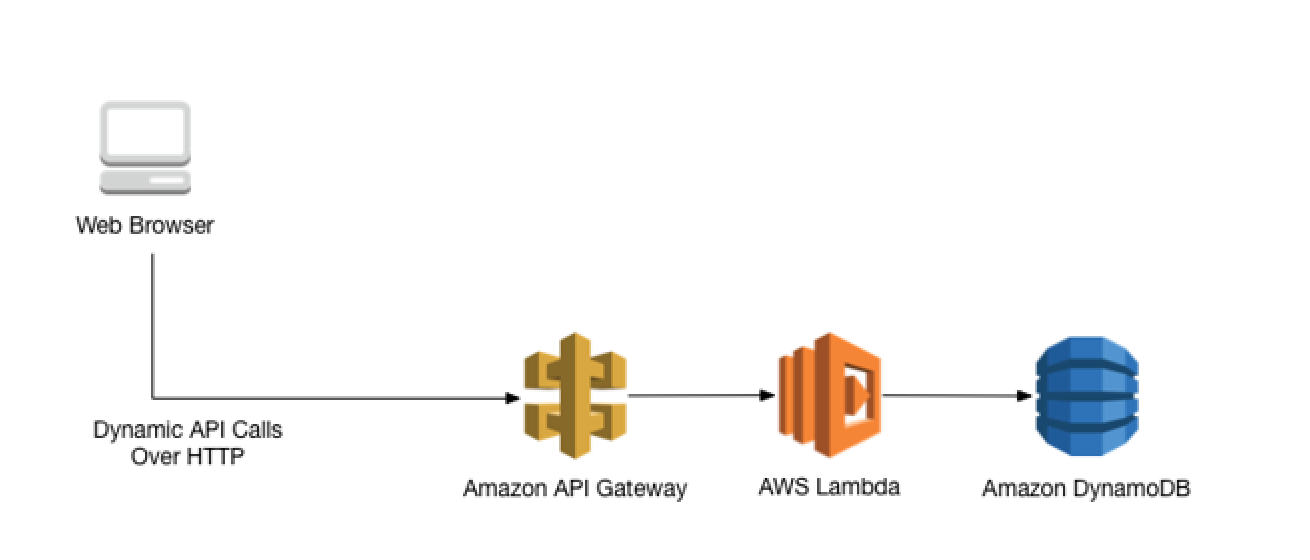
If you're on AWS (Amazon Web Services), the cheapest way to get contact form functionality is to use AWS' API Gateway to set up an API, and DynamoDB for a database, using a Lambda function in the API to save to the database.
You can also host your website itself on AWS, but that isn't necessary, as long as you can access the code to insert your form.
The flow is illustrated above - from your web app (in the browser), to the API gateway, to the Lambda function, to the DynamoDB database.
How to Set Up The API
Using API Gateway
For the API, you need go to API Gateway and set it up to accept POST requests.
Enable CORS so users from anywhere can make this post request - that is, submit email addresses to be stored in your database.
Writing the Lambda Function in JavaScript
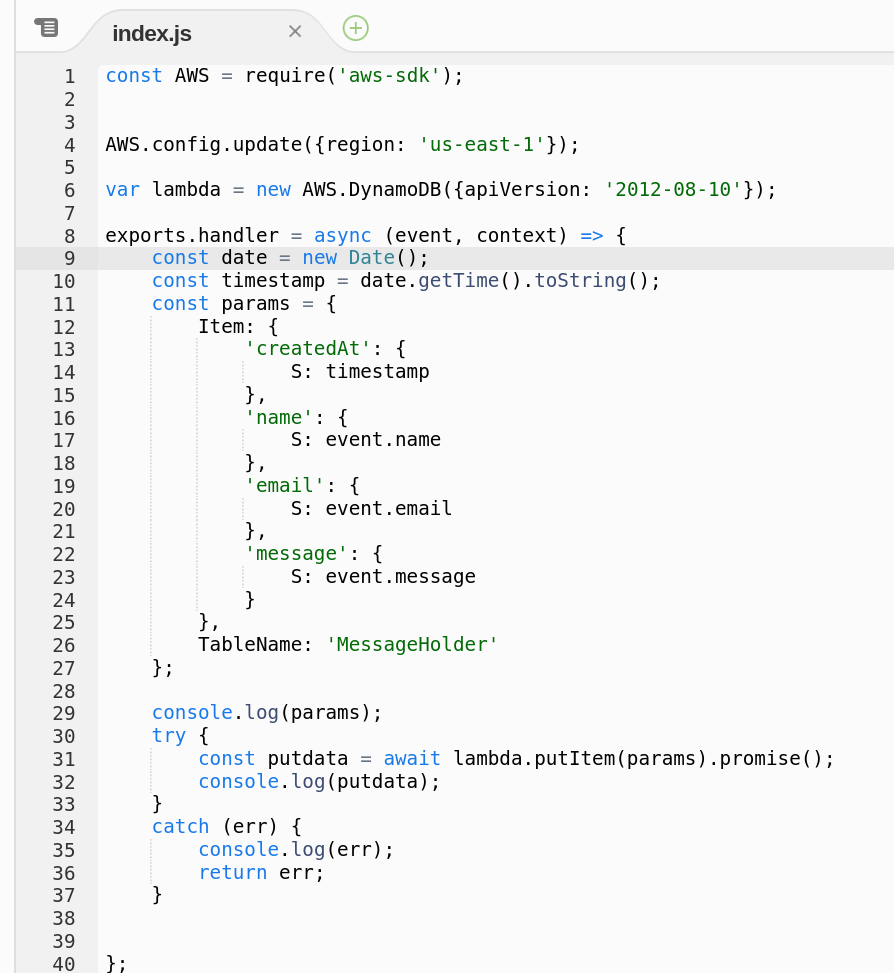
Then you need to write a Lambda function that will be invoked by this Lambda function on every upload.
Basically it will react when a new post request arrives, by saving the information in that post request to your database.
The Lambda function code I wrote, in JavaScript, is shown below:

You will need to write this Lambda function first, and then configure your API gateway to use this on every invocation.
Creating the DynamoDB Table
You'll also need to create a DynamoDB table, to be the destination.
In this example, mine is called MessageHolder. So you'd need to create a MessageHolder DB.
After you've set up the above, create a JavaScript submit form, where you make post requests on clicking button.
Basically, every time the user clicks submit, your form should take the data the user uploaded, and submit it by post request via the API endpoints created when you created your API gateway endpoints.
How to Code the JavaScript (React) Form to Save Emails
Here is example JavaScript code, written for React, which accepts user emails from a form and then sends them to the API to be saved.
It's confirmed to work: I use it, with the only difference being the endpoint (the one in the code is fake).
This solution costs much less than a dollar a month. It's extremely cheap, and it'll last forever (no software updates needed).
Whenever you want to see how many emails you've gotten, check the AWS console, for the name of your database. Click on it to see how many entries are in your database.
No new entries - no messages. New entries - new messages. Simple!
If you wanted to secure your API endpoint against bad actors and spurious requests, you can use a WAF policy.
How to Set Up A Submit Form Using JavaScript and GCP
If you don't want to use AWS, then this is roughly how you'd do the same thing on GCP (Google Cloud Platform).
You'd begin by setting up an API proxy, basically the GCP version of API gateway. Its job is to make sure that the requests are coming from the right domain.
If there are, it invokes a cloud function which inserts that information in Firestore, GCP's go-to database for web development (among other things).
Another GCP function could listen to `create` doc events on the collection, and send welcome emails to users, instantaneously.
That would be the method, though I haven't tried it personally (this information came courtesy of @viggy28).
Platforms aside, if you're using React, the form will look practically the same - that will be unchanged.
And once you have a form for 1 website, confirmed to be working, you can copy and paste the code into all your other projects, too.
And that's how you can create a portable, reuseable form you can use reuse on all of your websites.
You are free to use and reuse this code under an MIT license. Please do!