How To Write A Slack Bot — with Python Code Examples
This post is now out of date, but is archived here for people who would like to see what it originally said, or are using a deprecated version of the Slack API.
Rather than follow this, please follow the updated version of this article, "How to Write a Slack Bot - With Python Code Examples", current as of 6/03/20.
In an earlier article, I walked through the components that go into making a Slack bot, in Python. In a later article, I share the code for a working bot. In this article, I’ll show step-by-step examples. This tutorial assumes you can work with Python, and that you’re using Slack’s Python client.
https://github.com/slackhq/python-slackclientSo let’s begin.
First, get your API key. You’ll need a Slack API key to fetch the necessary data for your bot.
In my case, after logging in to Slack, I went to the very top left corner of the screen, and clicked on my screen.
From there, I went to the section conveniently labelled “API” (having used API’s where the destination was much less clear — thank you, Slack).
In the upper left hand corner, there should be a button labelled “My Auths.” Click that, and you’ll be able to create your authorization token. Mine lists my company name, my name, the application and scope — for mine, identify, read, post, client — and the issuance date.
Fundamentally, creating your key is point-and-click. The good news is that every step after this one gets progressively more interesting.
Now we can start doing things with our bot.
To simplify, let’s assume you want your bot to talk to someone. For example, it should ask them, “What did you think of the lunch today?” and “Would you want me to eat from this vendor again?”
Once their response are in that bot’s chat history (meaning simply that the person typed them to that bot), you can retrieve them anytime. Asking one user a couple of questions isn’t that useful, but asking 25 users, and collecting their responses, can be very useful.
Next, you’ll need to find out the ID of the user you want to chat with, in order to address them. No user or room ID’s to talk to equals no chat bot.
Use the “list users” API endpoint, documented along with all the other Slack methods at their site below:
https://api.slack.com/methods/users.listGo to the “Tester” tab, after signing in, and test this in your browser. Since this is a simple GET request, the URL you see in the test section can be directly entered into your browser. Presto — you now have access to all the user ID’s your chat bot will need to chat up your company’s users.
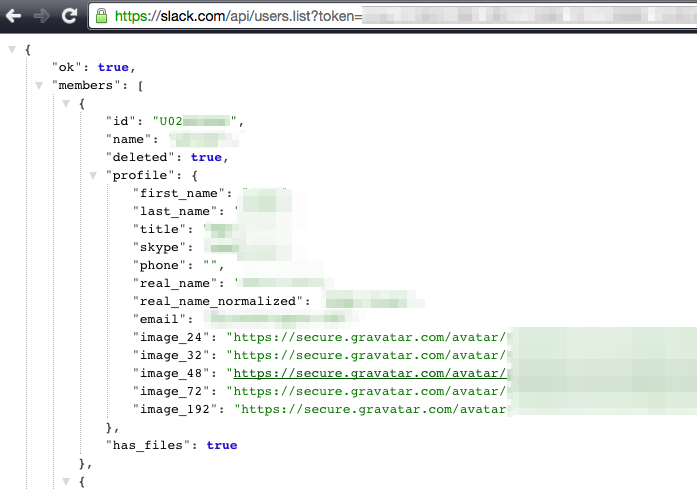
You’ll want to grab a user ID like the one you see here. For my examples, I’ll use “UO2EZLEIT,” which corresponds to me.
Between our API token and our user ID, we have enough information now to originate a chat from our chat bot to a real human.
Time to fetch the channel ID we need for our bot to have a user chat.
The next Slack API method we’ll use is “im.open”, which will open up a chat channel if one doesn’t exist, and — the important part — get the ID of that channel. Think of this as the bot’s prerequisite to real live chat.
The Python code is fairly simple. We open the Slack client, giving it our token as an argument. I have a test call next, which you can omit (it won’t hurt anything). Then we have the “im.open” method itself — which will tell me the piece I really need, the channel ID to chat with that user. I use “print” before I call the command to see the output.
from slackclient import SlackClient
 token = “xoxo-love”
 sc = SlackClient(token)
 print sc.api_call(“api.test”)
 print sc.api_call(“im.open”, user=”U02EZLEIT”)
I’ll name this script im_open.py. If I run python im_open.py I’ll see a result like this:

Final step: the actual chat.
I have the missing piece to open a chat, the channel ID for my bot to chat with that user — in this case, “D012HOUSE.”
I use the method “chat.PostMessage.” For my friendly test, I’ve chosen the greeting text “Hello!\nNice to meet you.”, using the newline character \n in order to spread my text over two lines.
from slackclient import SlackClient
 token = “xoxo-love”
 sc = SlackClient(token)
 chan=”D012HOUSE”
 greeting=”Hello!
 Nice to meet you.”
 print sc.api_call(“chat.postMessage”, as_user=”true:”, channel=chan, text=greeting)
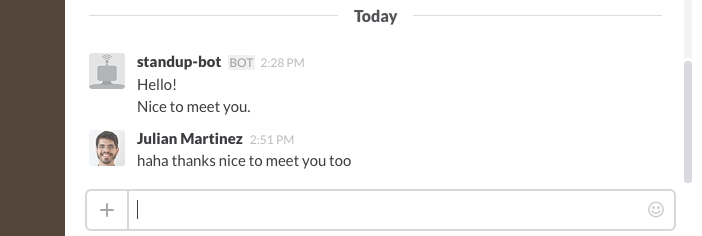
I have Slack open on my desktop. If I run the script containing this Python code and switch to Slack, I see this:
Slack’s API lets you call these methods as often as 1x per second. If I wanted to tell everybody individually in my 20-person group about someone’s surprise birthday example, for example, I could repeat the process shown above for all 20 users, with none of them knowing my chat bot had chatted with each person individually. To do this truly simultaneously, I’d need to use threads, but that’s outside the scope of this article.
To get the user responses to my bot’s text, I can use the “im.history” method for that user as shown in the code below, to return my chat bot’s entire conversation history with a user:
from slackclient import SlackClient
 token = “xoxo-love”
 sc = SlackClient(token)
 print sc.api_call(“im.history”, channel=”D012HOUSE”)
Which returns this output — with the top two lines as confirmation shown below:

And there you have it: enough material for a working survey bot.
You can extend it to do things as different as tell your users the temperature, notify them of upcoming meetings, solicit their feedback for proposed events, or even collect their updates for a robot-update. Repeat the above steps for multiple users, and your chat bot’s ready to go.
Keep practicing, keep reading, and most of all, keep iterating; it’s the later versions of bots, in my experience, that add the most value. And last but not least, use Slack’s support system. They built the platform, but unlike many companies in that position, their email responses are extremely helpful.